|
|
马上注册成为ROSABC会员,随时发帖回复。
您需要 登录 才可以下载或查看,没有账号?会员注册

x
MetaRouter 事例
现在你看到之前添加的虚拟接口在物理路由器的 interface 目录中显示为 vif1,当然在 metarouter 的接口中 显示为 ether1,你可以在 2 个接口上配置 IP 地址,并连接网络。创建一个 bridge 在允许传输的物理接口和虚 拟接口上。下面是 winbox 操作界面
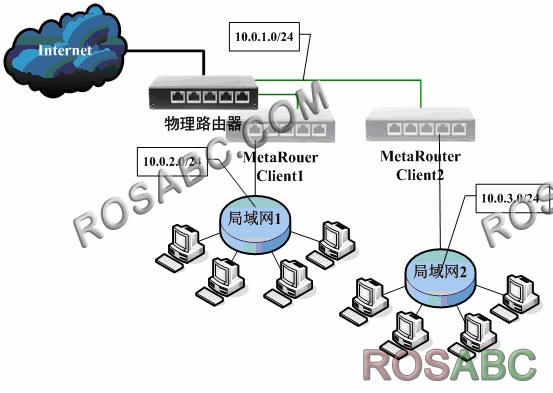
这个事例将介绍如何配置 MetaRouter 功能,为局域网内部独立 RouterOS 虚拟路由,基于 RB450 配置
MetaRouter,我们将建立两个 Client 虚拟路有,并管理两个不同的局域网。目的是让两个个局域网的管理员 可以管理自己的路由器(MetaRouter),并根据自己的需要配置他们自己的防火墙、流量控制和 nat 规则,当然他们不能连接物理路由器(没有分配权限):
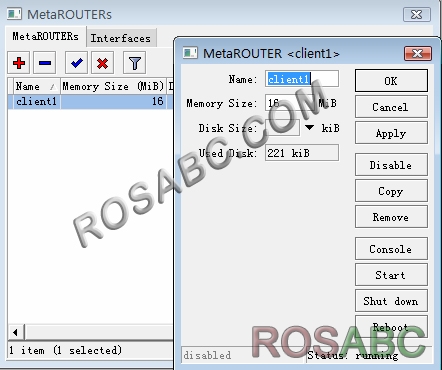
1.给客户添加一个 MetaRouter:
[admin@ROSABC] /metarouter> add name=client1 memory-size=16
[admin@ROSABC] /metarouter> print
Flags: X - disabled
# NAME MEMORY-SIZE DISK-SIZE USED-DISK STATE
0 client1 16MiB 0kiB 221kiB running
[admin@ROSABC] /metarouter>
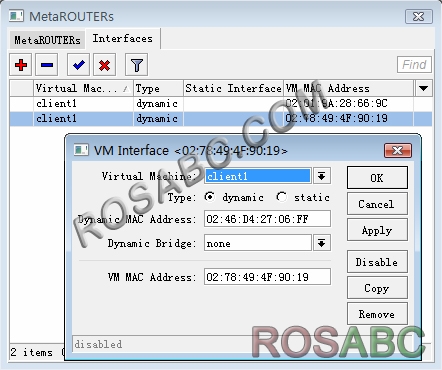
2. 添加 MetaRouter 虚拟机的接口:
[admin@ROSABC] /metarouter interface> add virtual-machine=client1
[admin@ROSABC] /metarouter interface> add virtual-machine=client1
[admin@ROSABC] /metarouter interface> print
Flags: X - disabled, A - active
# VIRTUAL-MACHINE TYPE VM-MAC-ADDRESS
0 A client1 dynamic 02:01:9A:28:66:9C
1 A client1 dynamic 02:78:49:4F:90:19
[admin@ROSABC] /metarouter interface>
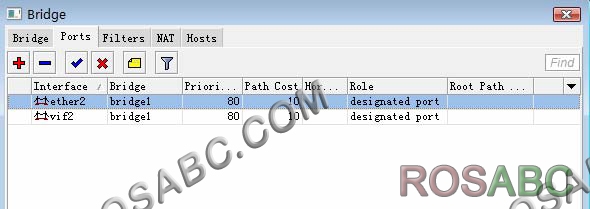
3. 创建一个桥接口,将 MetaRouter 接口与以太网接口桥接,这里我们将 vif2 的虚拟接口放入内网的桥中,用于客户端通过物理接口连接(使用桥接目的是将虚拟路由的内网接口,通过桥接透穿到真实的网络中) :
[admin@ROSABC] /interface bridge> add
[admin@ROSABC] /interface bridge> print Flags: X - disabled, R - running
0 R name="bridge1" mtu=1500 arp=enabled mac-address=00:00:00:00:00:00 protocol-mode=none priority=0x8000 auto-mac=yes admin-mac=00:00:00:00:00:00 max-message-age=20s
forward-delay=15s transmit-hold-count=6 ageing-time=5m
[admin@ROSABC] /interface bridge port> add interface=ether2 bridge=bridge1
[admin@ROSABC] /interface bridge port> add interface=vif2 bridge=bridge1
[admin@ROSABC] /interface bridge port> print
Flags: X - disabled, I - inactive, D - dynamic
# INTERFACE BRIDGE PRIORITY PATH-COST HORIZON
0 ether2 bridge1 0x80 10 none
1 vif2 bridge1 0x80 10 none
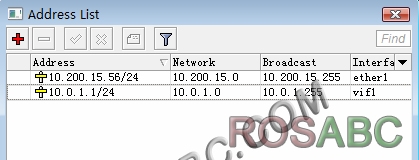
4. 为新的 MetaRouter 接口添加 IP 地址,ether1 作为物理外网连接(假设我们已经配置好物理路由器的网络 连接),vif1 用于连接 MetaRouter 主机系统(vif1 可以认为是一个 lan 接口连接):
[admin@ROSABC] /ip address> add address=10.0.1.1/24 interface=vif1
[admin@ROSABC] /ip address> print
Flags: X - disabled, I - invalid, D - dynamic
# ADDRESS NETWORK BROADCAST INTERFACE
0 10.200.15.56/24 10.200.15.0 10.200.15.255 ether1
1 10.0.1.1/24 10.0.1.0 10.0.1.255 vif1
[admin@ROSABC] /ip address>
5. 进入 metarouter 控制平台,通过 console 命令:
[admin@ROSABC] /metarouter> console client1 [Ctrl-A is the prefix key]
Starting...
Starting services...
MikroTik 3.22
MikroTik Login: admin
Password:
[RouterOS@ROSABC] > /sys identity set name=Client1
6. 配置 metarouter 的参数,设置以太网接口名称,让客户明白设备的连接情况:
[admin@Client1] /interface ethernet> print
Flags: X - disabled, R - running, S - slave
# NAME MTU MAC-ADDRESS ARP
0 R ether1 1500 02:49:E8:55:8E:E8 enabled
1 R ether2 1500 02:16:16:90:EF:0E enabled
[admin@Client1] /interface ethernet> set 0 name=wan
[admin@Client1] /interface ethernet> set 1 name=lan
[admin@Client1] /interface ethernet> print
Flags: X - disabled, R - running, S - slave
# NAME MTU MAC-ADDRESS ARP
0 R wan 1500 02:49:E8:55:8E:E8 enabled
1 R lan 1500 02:16:16:90:EF:0E enabled
[admin@Client1] /interface ethernet>
为外网和内网接口配置 IP 地址
[admin@Client1] /ip address> add address=10.0.1.2/24 interfae=wan
[admin@Client1] /ip address> add address=10.0.2.1/24 interface=l
[admin@Client1] /ip address> print
Flags: X - disabled, I - invalid, D - dynamic
# ADDRESS NETWORK BROADCAST INTERFACE
0 10.0.1.2/24 10.0.1.0 10.0.1.255 wan
1 10.0.2.1/24 10.0.2.0 10.0.2.255 lan
添加默认网关
[admin@Client1] /ip route> add gateway=10.0.1.1
[admin@Client1] /ip route> print
Flags: X - disabled, A - active, D - dynamic,
C - connect, S - static, r - rip, b - bgp, o - ospf, m - mme, B - blackhole, U - unreachable, P - prohibit
# DST-ADDRESS PREF-SRC G GATEWAY DISTANCE INTERFACE
0 A S 0.0.0.0/0 r 10.0.1.1 1 wan
1 ADC 10.0.1.0/24 10.0.1.2 0 wan
2 ADC 10.0.2.0/24 10.0.2.1 0 lan
[admin@Client1] /ip route>
配置 nat 转换
[admin@Client1] /ip firewall nat> add action=masquerade out-interface=wan chain=srcnat
配置完成后,我们可以通过局域网的 winbox 扫描到配置好的 metarouter
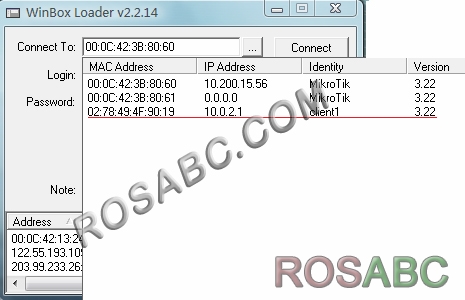
通过连接后,在 winbox 中显示 MetarRouter 信息

这样我们可以通过局域网内部,连接虚拟的 RouterOS 上网。这样我们可以让局域网 1 的管理进入 client1 的MetaRotuer 配置自己的网络参数。
我们在用同样的方法建立 10.0.3.0/24 网络的第二个 MetaRouter 在 RouterBOARD 上,只要硬件性能允许, 为不同客户提供多个自主路由器管理:
|
|